Integrating screenshots in Allure Report with Pytest and Selenium
The process of interpreting test results should be optimized for speed and clarity. Ideally, the root cause of a failure should be immediately identifiable without requiring the reader to inspect additional code, execute a debugger, or seek assistance from other team members.
To achieve this goal, test reports must convey comprehensive information in a concise format. One effective approach is the inclusion of screenshots, which provide visual context for test failures. This guide outlines the process of capturing screenshots using the pytest-selenium plugin and integrating them into test reports with Allure Report for enhanced readability and analysis.
1. Preparation
Prerequisites
Make sure the following prerequisites are met:
Dependency list
This guide uses the following packages:
Code sample
The complete source code used in this guide is available at https://github.com/allure-examples/guide-pytest-selenium-screenshots.
Setup
To run the examples in this guide:
- Install Python
- Install Allure Report
- Download a fresh project with Pytest from Allure Start
- Add the pytest-selenium plugin to your project. For example, if you use
pip:
pip install pytest-selenium2. Screenshots with Selenium
To take screenshots with pytest-selenium at an arbitrary time, use the methods provided by the WebDriver object, for example, save_screenshot. To get the WebDriver object, you can use the selenium fixture:
def test_example(selenium):
    selenium.get("https://www.selenium.dev/")
    try:
        assert "Selenium" in selenium.title
    except AssertionError:
        selenium.save_screenshot("path/to/screenshot.png")
        raise
Whenever you call the save_screenshot method, a screenshot will appear at path/to/screenshot.png. You can also use other methods that the WebDriver object provides:
To take a screenshot of a particular element, use the screenshot method of the WebElement object, for example:
element = selenium.find_element(By.NAME, "q") # or however you find the element
# take the screenshot
element.screenshot("path/to/element_screenshot.png")
You can also use these properties of WebElement:
3. Automatic screenshots on failure
To take screenshots automatically of every test failure:
Write a hook that pytest-selenium will call to process the screenshots it takes. The hook code must be placed in the
conftest.pyfile in your project's test root directory:python# Contents of conftest.py import base64 def pytest_selenium_capture_debug(item, report, extra): for log_type in extra: if log_type["name"] == "Screenshot": content = base64.b64decode(log_type["content"].encode("utf-8")) with open(f"{item.name}.png", "wb") as f: f.write(content)Set the
selenium_capture_debugoption tofailurein Pytest configuration. For example, if you usepyproject.tomlas a configuration file, add the following:toml[tool.pytest.ini_options] ... selenium_capture_debug = "failure"
Now, when a test fails, a screenshot file will be saved automatically in your project.
4. Integrating with Allure Report
While capturing screenshots is beneficial for diagnosing test failures, viewing them separately can be inefficient. When test data is dispersed across multiple locations, the process of identifying and resolving failures becomes more time-consuming.
To streamline this workflow, screenshots should be directly attached to Allure Reports, ensuring all relevant test information is consolidated in a single location for efficient analysis and troubleshooting.
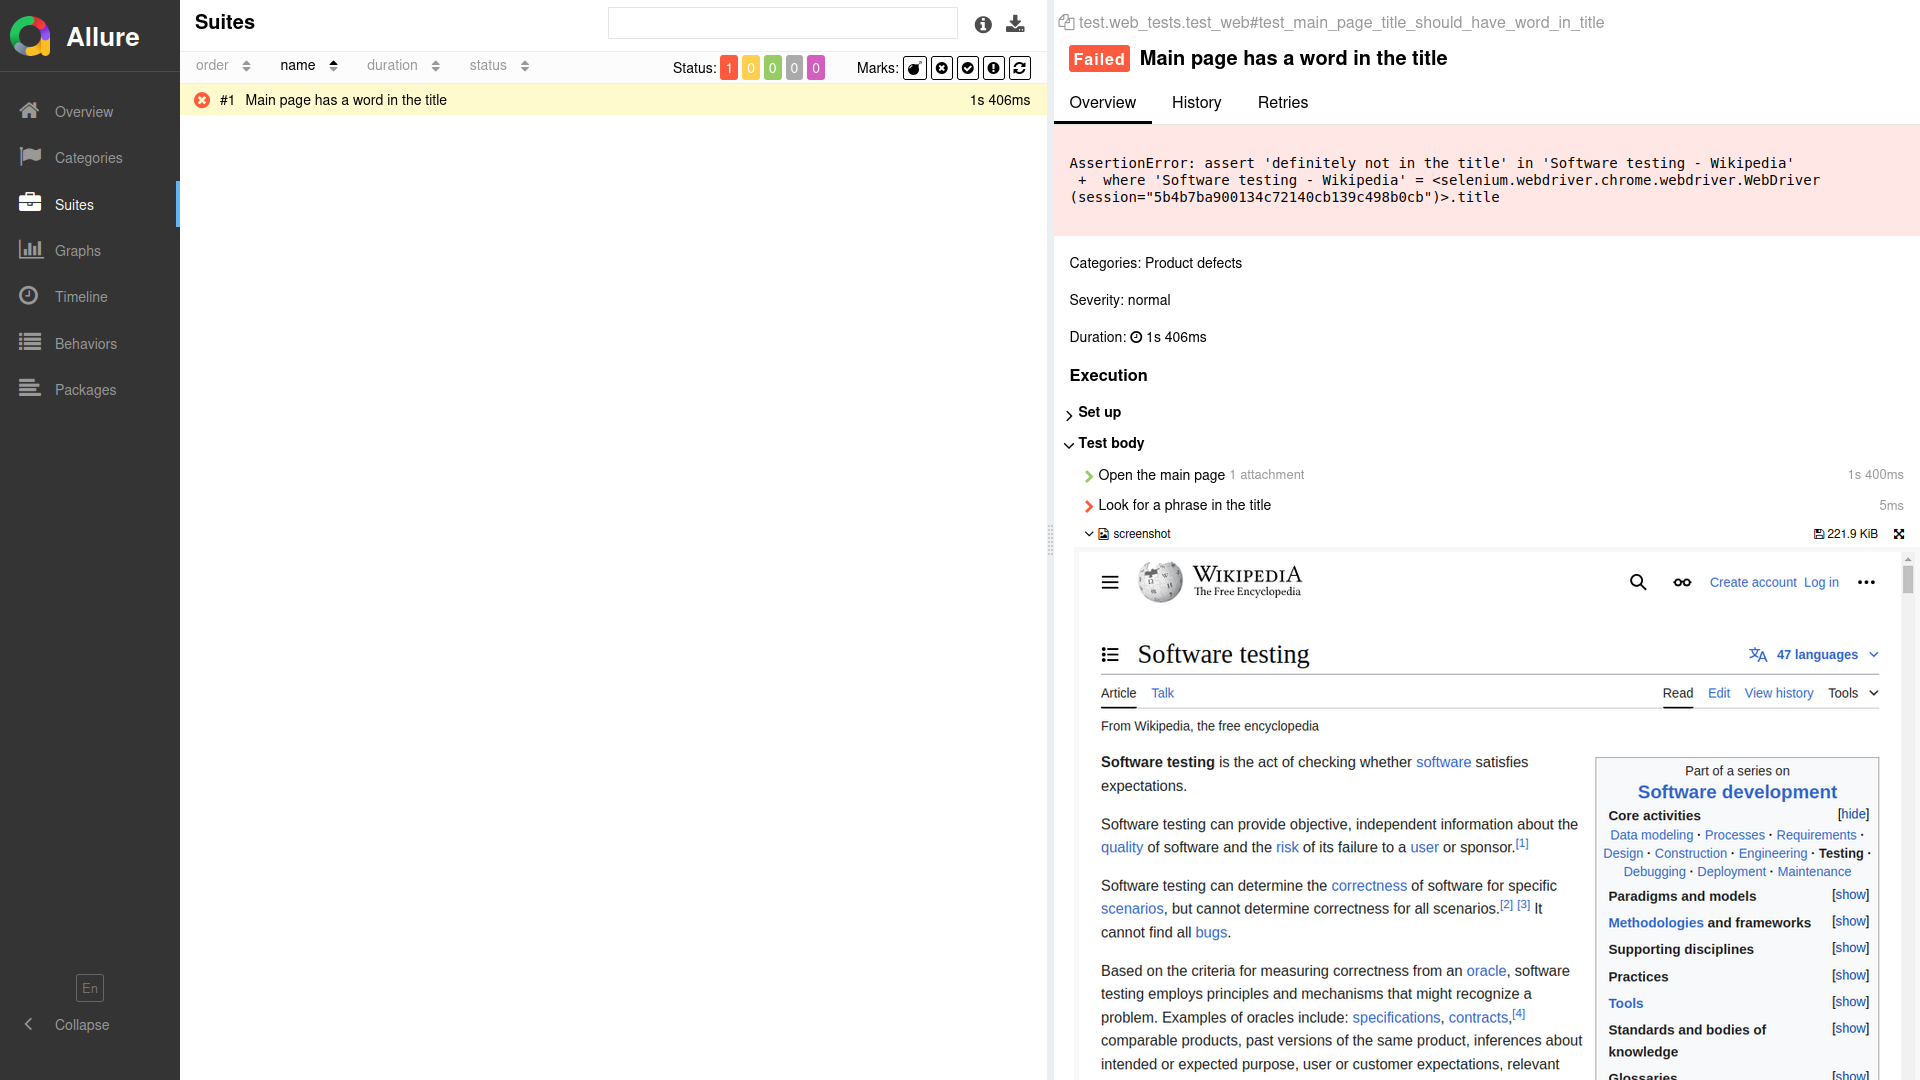
Allure Report shows you screenshots inside the test in which they were taken. That is also where the error messages and other attachments are presented to you, so you have everything you need to analyze test results in one place:

To attach screenshots to Allure, use either the allure.attach() or the allure.attach.file() functions.
Use allure.attach.file() to attach an existing file:
import allure
from pathlib import Path

# Attach a screenshot of a page
def attach_screenshot(driver, path):
    name = Path(path).name
    driver.get_screenshot_as_file(path)
    allure.attach.file(
        path,
        name=name,
        attachment_type=allure.attachment_type.PNG,
    )

# Attach a screenshot of an element
def attach_element_screenshot(element, path):
    name = Path(path).name
    element.screenshot(path)
    allure.attach.file(
        path,
        name=name,
        attachment_type=allure.attachment_type.PNG,
    )
Use allure.attach() if you don’t need to save the screenshot on disk:
import allure

# Attach a screenshot of a page
def attach_screenshot(driver, name):
    allure.attach(
        driver.get_screenshot_as_png(),
        name=name,
        attachment_type=allure.attachment_type.PNG,
    )

# Attach a screenshot of an element
def attach_element_screenshot(element, name):
    allure.attach(
        element.get_screenshot_as_png(),
        name=name,
        attachment_type=allure.attachment_type.PNG,
    )
TIP
When you need to attach a screenshot you just took, prefer using the allure.attach function if possible. The reason is that when you save a screenshot on disk, it may not always be immediately available for reading because of OS caching. If that happens, you may end up with an empty file attached to Allure.
To automatically attach screenshots to Allure on each test failure, use a slightly modified version of the pytest-selenium hook we’ve written in the Automatic screenshots on failure section:
# Contents of conftest.py
import allure
import base64


from allure_commons.types import AttachmentType

def pytest_selenium_capture_debug(item, report, extra):
    for log_type in extra:
        if log_type["name"] == "Screenshot":
            content = base64.b64decode(log_type["content"].encode("utf-8"))
            allure.attach(
                content,
                name="Screenshot on failure",
                attachment_type=AttachmentType.PNG,
            )
5. Other attachment types
Allure Report can also handle other types of attachments - text, tables, URI lists, or documents (XML, JSON, YAML). For example:
allure.attach(
    response_content,
    name="response content",
    attachment_type=allure.attachment_type.XML
)
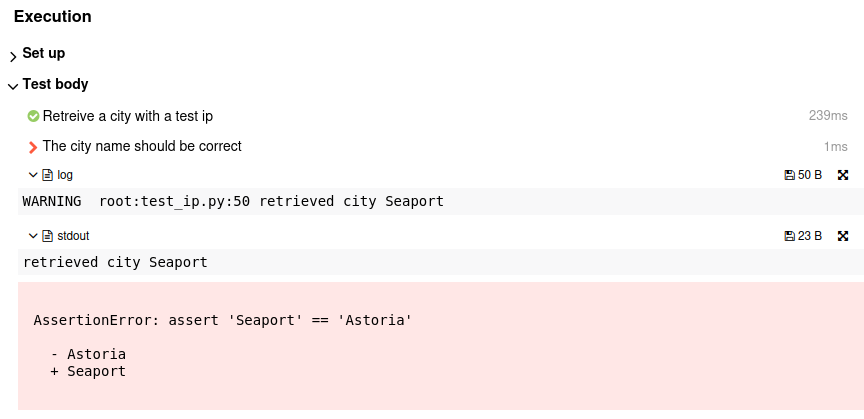
Allure Pytest makes some attachments automatically:
- everything passed to
sys.stdout- e.g.print(...) - everything passed to
sys.stderr- e.g.print(..., file=sys.stderr) - logging, e.g.
logging.warning(...)
These outputs are attached as pseudo-files to the report:

If you don’t want all of this to appear in the report, use the --allure-no-capture option.
Allure also allows you to attach videos. You can consult the official documentation for more on attachments with Pytest and attachment types.
6. Conclusion
When using Pytest with Selenium, you can take screenshots at arbitrary times in your tests or instruct Selenium to take screenshots automatically on test failures. Allure Report allows viewing the screenshots and other test attachments (text, documents, tables, video) in one place, providing the reader with the maximum amount of data to resolve test failures.