
Azure DevOps integration
With the Allure Report extension for Azure DevOps, you can set up automatic generation of reports after each test launch for your project. The reports are displayed in an Allure Report tab on the pipeline run page.
By default, the extension generates reports with Allure Report 3. If needed, you can switch to Allure Report 2 instead.
1. Install the extension
For the integration to work, you need to install the official Allure Report extension to your Azure DevOps organization.
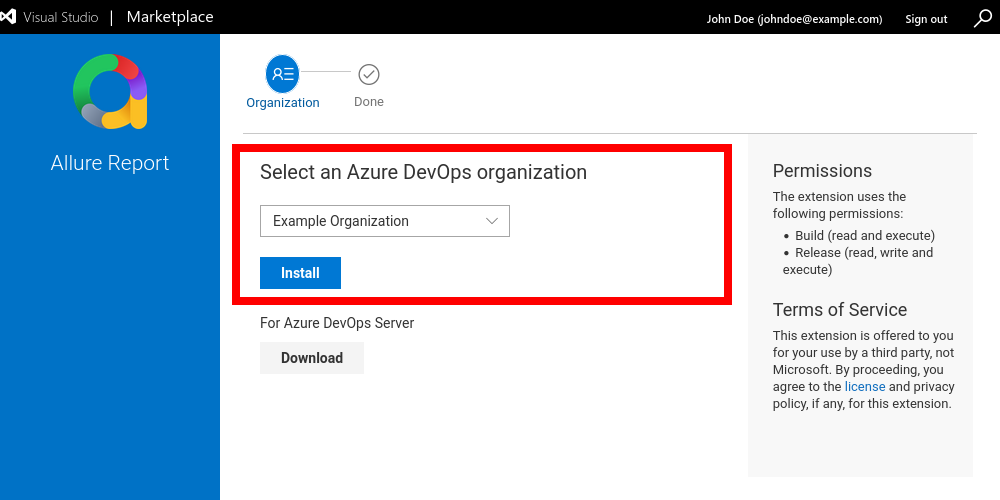
On the Allure Report extension page in the Visual Studio Marketplace, click Get it free.
If prompted, sign in as your organization's administrator.
Select your organization from the dropdown list. Click Install.
2. Modify the pipeline
Once the extension is installed, it makes the PublishAllureReport@2 task available in Azure Pipelines. To publish Allure Report for a pipeline, add a step with this task after all the steps that produce test results:
steps:
  - script: ./gradlew clean test
    displayName: Run tests

  - task: PublishAllureReport@2
    displayName: Publish Allure Report
With no parameters, the task generates a report from the test results in the allure-results directory and publishes it under the name “Allure Report”.
Parameters
Specify parameters in the inputs section of the step if the defaults do not fit your project:
testResultsDir— path to the directory with test results. Relative paths are resolved against the pipeline's working directory ($(System.DefaultWorkingDirectory), the repository checkout root). Depending on the test framework and the Allure adapter configuration, an appropriate path may beallure-results,build/allure-results, or some custom path. Defaults toallure-results.reportName— the report name to display in the Azure DevOps UI. Defaults to “Allure Report”. This value also takes precedence over the report name set in the configuration file.reportDir— path to an Allure Report 3 report generated by an earlier step of the pipeline. If specified, the task publishes this report instead of generating a new one, andtestResultsDiris ignored. The report must be generated in single-file mode, unless it was published to a storage service. A report published this way keeps the name it was generated with — thereportNameparameter has no effect on it.allureVersion— an Allure Report 2 version, e.g.2.36.0. If specified, the task generates the report with Allure Report 2 instead of Allure Report 3.allureDownloadUrl— a custom URL to download the Allure Report 2 distribution from, see Using Allure Report 2.
- task: PublishAllureReport@2
  displayName: Publish Allure Report
  inputs:
    testResultsDir: build/allure-results
    reportName: My Report
Configuration file
If the working directory contains an Allure Report 3 configuration file (allurerc.js, allurerc.mjs, etc.), the task generates the report according to it. Two things to keep in mind:
The task can only publish reports generated in single-file mode. Enable it in the configuration like so:
jsexport default { name: "My Report", plugins: { awesome: { options: { singleFile: true, }, }, }, };Reports that are not generated in single-file mode are skipped with a warning.
If the configuration file imports packages, such as
@allurereport/core, make sure your pipeline installs the project's dependencies before the task runs.
If there is no configuration file, the task generates a single-file report with the default settings.
Publishing multiple reports
To publish several reports from a single pipeline run, add multiple task steps with different inputs:
- task: PublishAllureReport@2
  displayName: Generate and publish a new report
  inputs:
    testResultsDir: path/to/allure-results
    reportName: Report 1

- task: PublishAllureReport@2
  displayName: Publish an already generated report
  inputs:
    reportDir: path/to/already-generated-report
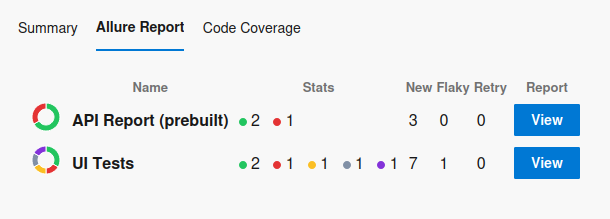
The Allure Report tab will then show the list of the published reports with their test statistics. Note that the second report in this example is displayed under the name it was generated with, not under a name from the pipeline definition.
Reports published to a storage service
If your Allure Report configuration enables publishing to a storage service, then generating a report also uploads it to the service, where it gets a permanent URL. In this case, the report directory on the build agent contains a reference to the hosted copy, and the task publishes only this metadata to Azure DevOps instead of the report files. The Allure Report tab then displays the hosted report directly from its URL. Single-file mode is not required for such reports.
For example, if your test step generates and publishes the report, point the task at the resulting report directory:
- script: npx allure run -- npm test
  displayName: Run tests and generate the report

- task: PublishAllureReport@2
  displayName: Publish Allure Report
  inputs:
    reportDir: allure-report
Since the tab loads such a report from the storage service, the report is only visible to users whose browsers can reach the service.
WARNING
The service must be reachable at a public HTTPS address: modern browsers do not allow pages on the public web, including Azure DevOps, to load content from private networks, so a report hosted on an intranet-only or localhost address will be blocked by the viewer's browser.
Using Allure Report 2
To generate the report with Allure Report 2 instead of Allure Report 3, set the allureVersion parameter:
- task: PublishAllureReport@2
  displayName: Publish Allure Report
  inputs:
    allureVersion: 2.36.0
Version 2.36.0 is bundled with the extension and works without downloading anything. Any other version is downloaded from the GitHub releases. Do not use versions older than 2.25.0, as they do not support the single-file mode required by the extension.
If your build agents cannot access GitHub, use the allureDownloadUrl parameter to download the Allure Report 2 distribution from a custom location. The placeholder in the URL is replaced with the allureVersion value:
- task: PublishAllureReport@2
  displayName: Publish Allure Report
  inputs:
    allureVersion: 2.36.0
    allureDownloadUrl: https://mirror.example.com/allure/allure-{{allureVersion}}.tgz
3. View test reports
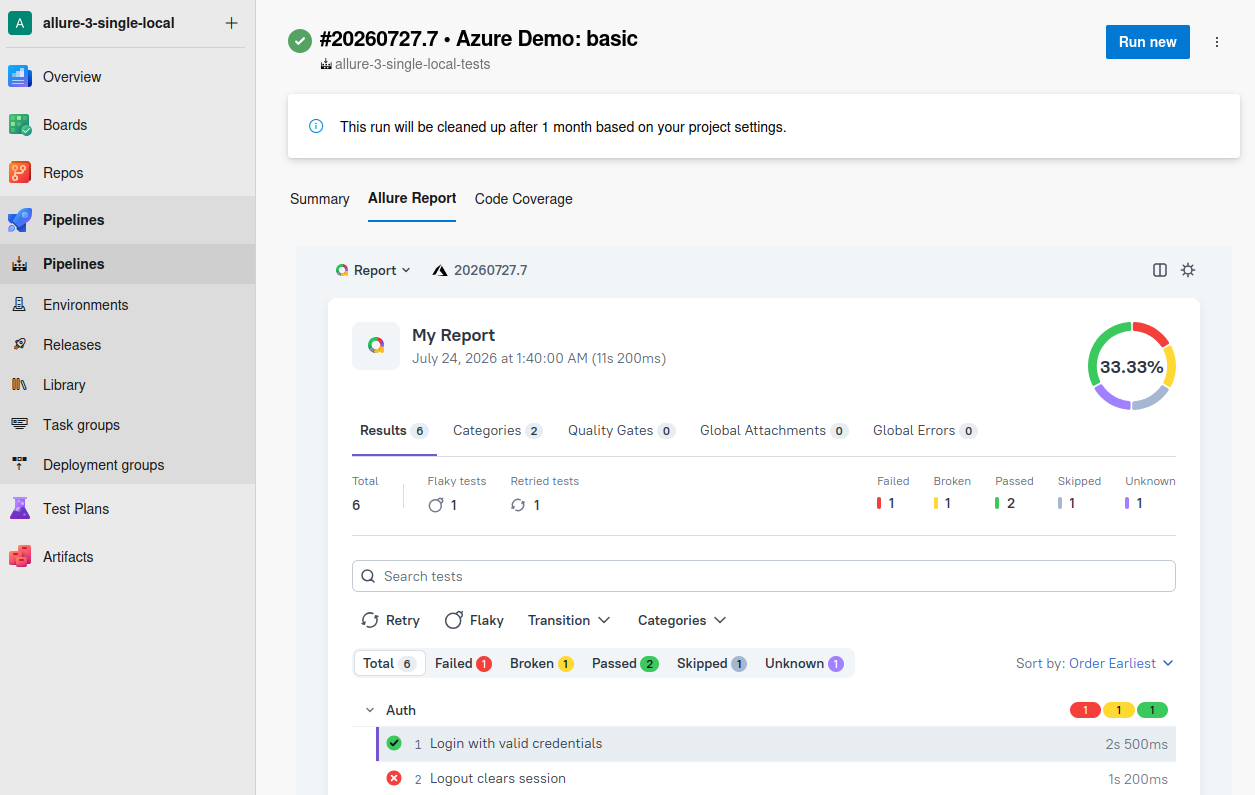
After the configuration, each new run's page will include the Allure Report tab.
If a single report was published, the tab displays it right away:
If there are several reports, the tab lists them along with their test statistics, and you can open any of them with the View button:
Migrating from version 1 of the extension
Version 1 of the extension provided the PublishAllureReport@1 task, which always generated reports with Allure Report 2. Version 2 adds the PublishAllureReport@2 task without removing the old one: pipelines that reference PublishAllureReport@1 keep working, and previously published reports remain viewable in the Allure Report tab. However, the version 1 task is frozen at its last release (1.5.0) and no longer receives fixes or features, so updating your pipelines is recommended.
INFO
The version 1 task is only available in organizations that had it installed before the extension was updated. If the extension was first installed at version 2 or later, PublishAllureReport@1 fails to resolve.
To migrate a pipeline:
Change the task reference from
PublishAllureReport@1toPublishAllureReport@2.Choose the report engine. All version 1 parameters (
testResultsDir,reportName,allureVersion,allureDownloadUrl) work in version 2 with the same meaning, and if your step setsallureVersion, it continues to generate the same Allure Report 2 reports as before. However, ifallureVersionis not set, the new task generates reports with Allure Report 3 — a new report engine with a different look. To keep the reports as they were, setallureVersionexplicitly:yaml- task: PublishAllureReport@2 displayName: Publish Allure Report inputs: allureVersion: 2.36.0
Limitations
The task can only publish reports generated in single-file mode, unless they were published to a storage service. Reports generated with a configuration file must have the mode enabled explicitly.
The maximum size of a report the tab can display is 512 MB. The task fails if the generated report file exceeds this limit. Reports larger than 20 MB are uploaded in chunks and may take a bit longer to open in the tab.
Troubleshooting
The Allure Report tab shows an error instead of a report
The error means that no report was attached to the pipeline run, even though the task ran. The most common cause is a configuration file that does not enable single-file mode: the task cannot publish such reports and skips them, leaving a warning about single-file mode in the task log. Enable the mode in the configuration as shown above.
Otherwise, check the log of the PublishAllureReport step for errors and warnings.
The report is empty
If the tab shows a report with no test results in it, the task generated the report from a wrong or empty directory. Check the following:
The
testResultsDirvalue matches the directory your test step actually writes results to, keeping in mind that relative paths are resolved against$(System.DefaultWorkingDirectory).The steps that produce test results run before the
PublishAllureReportstep and actually wrote the result files. For example, make sure the pipeline does not skip the test step when tests fail.The task log: an error mentioning the test results directory, such as
can't read directory, means the directory did not exist when the task ran.