Setting up JUnit 5 with GitHub Actions
When we write our tests, the basic principle is to make them as focused as possible to minimize the number of error sources for each test. Ideally, when a test fails, you should only have to look for the cause in one place. The test environment causes many failures, so it has become standard practice to run tests on a CI server. This allows us to keep the environment constant and avoid the hated phrase - “Hey, it works on my machine.”
A CI server with tests also allows every team member to run tests easily without setting up the whole environment on each computer. Testing becomes a tool for the whole team, not just QA specialists.
In this guide, we’ll demonstrate the benefits of running tests in a CI and show how to set up Allure Report with GitHub Actions and JUnit.
1. Preparation
Prerequisites
Make sure the following prerequisites are met:
- A GitHub repository is created and GitHub Actions are enabled.
- A Selenoid server is up and running (for running UI tests).
- Docker is installed (for Selenoid).
Dependency List
This guide uses the following packages:
- org.aspectj:aspectjweaver: 1.9.22
- org.junit:junit-bom: 5.11.3
- org.junit.jupiter:junit-jupiter-api
- org.junit.jupiter:junit-jupiter-engine
- com.codeborne:selenide: 7.5.1
- io.qameta.allure:allure-bom: 2.29.0
- io.qameta.allure:allure-junit5
- io.qameta.allure:allure-selenide
Code sample
The complete source code used in this guide is available at https://github.com/allure-examples/guide-junit5-github-actions.
Setup
You’ll need to create a Git repository with your project and upload it to GitHub. You can download a default project with JUnit, Gradle, and Allure from Allure Start. The GitHub repository needs to have GitHub Actions (they are enabled by default; if not - follow the instructions from here).
If you want to run UI tests, you’ll also need to set up a Selenoid browser farm (or have access to one). If you’re setting it up yourself, your computer will need to have Docker installed.
2. Setting up GitHub Actions
To begin with, you’ll need to create an Actions workflow. In your repository, create a folder called .github/workflows. GitHub recognizes any file with the .yml or .yaml extension in that folder as a workflow. So, let’s go ahead and create one with the following content:
name: Run tests
on: [push]
jobs:
  test:
    runs-on: ubuntu-latest
    steps:
      - uses: actions/checkout@v4

      - name: Set up JDK
        uses: actions/setup-java@v4
        with:
          distribution: zulu
          java-version: 17

      - name: Run tests
        run: ./gradlew clean test
Let’s go over what this means. The name is going to be displayed in the Actions tab when you run this. on: [push] is the trigger that executes the workflow; in this case, it’s when we push to the repository. You can add other triggers, e.g. on: [push, workflow_dispatch]; now, the workflow will both run on push and allow you to trigger the workflow manually. The rest of the file describes the actual stuff that happens when the workflow is triggered: setting up the JDK and running our tests.
Now, let’s commit our new workflow and push it to GitHub. This will create a new Action and immediately execute it:
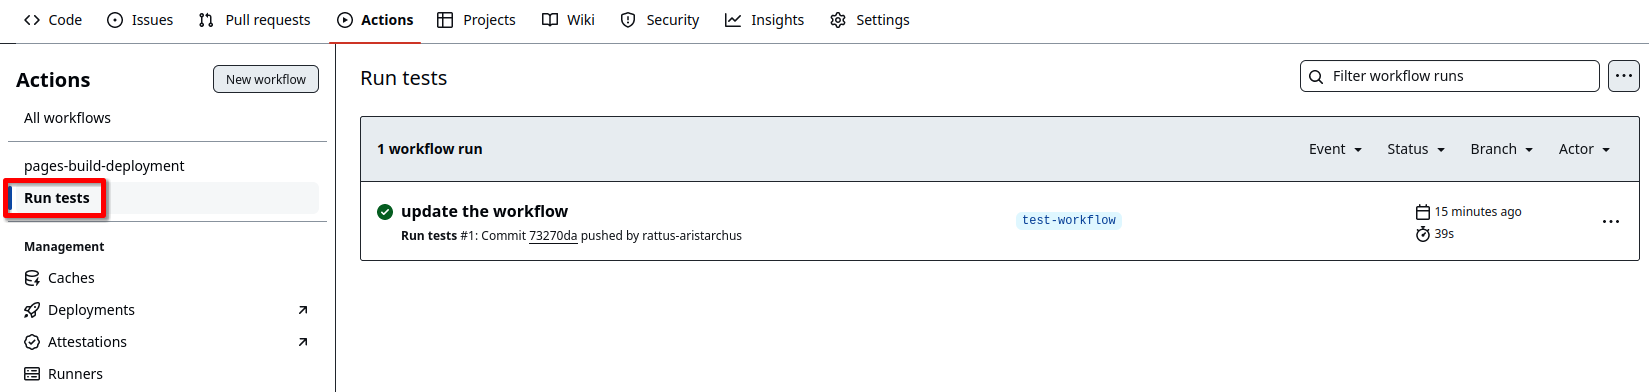
Inside the workflow run, you’ll find a log from the tests that have been executed:

We’re not finished, though. As a general rule, people don’t run browser GUIs on CI/CD servers: it’s too resource-intensive, difficult to scale, and there is a lot of hassle with version management. This is why your GitHub virtual machine doesn’t have a browser, so all your GUI tests will throw errors.
One solution is to use a remote browser on Selenoid, which is specifically created to run lots of browsers efficiently. The way you connect to it depends on your browser control tool. We’re using Selenide, and it just needs the address of our Selenoid server:
@BeforeAll
static void setupSelenoid() {
    Configuration.remote = "https://your.selenoid.address/wd/hub";
}
However, it's considered a bad practice to embed URLs like this directly into the source code. Instead, let's pass it via an environment variable:
@BeforeAll
static void setupSelenoid() {
    String selenideUrl = System.getenv("SELENIDE_URL");
    if (selenideUrl != null && !selenideUrl.isEmpty()) {
        Configuration.remote = selenideUrl;
    }
}
And propagate a GitHub variable into this environment variable in the workflow definition:
name: Run tests
on: [push]
jobs:
  test:
    runs-on: ubuntu-latest
    steps:
      - uses: actions/checkout@v4

      - name: Set up JDK
        uses: actions/setup-java@v4
        with:
          distribution: zulu
          java-version: 17

      - name: Run tests
        run: SELENIDE_URL="${{ vars.SELENIDE_URL }}" ./gradlew clean test
Now, as long as you have the SELENIDE_URL GitHub variable defined in the repo, provided it points to an existing Selenoid server, your UI tests should also run on GitHub Actions.
Excellent! Now, everyone can use tests - they will be executed whenever someone commits something. However, the output doesn’t tell us much about test results. Whether you want to debug or just get a general understanding of the state of the system, an Allure report would be much easier to read.
3. Integrating with Allure Report
Running Allure Report on a CI server is the best way to make use of all its features. In particular, you will automatically have access to test run history. With test run history, you can identify unstable tests, find tests that changed their status since last report, and visualize changes in metrics.
For GitHub Actions to work with Allure Report, we’ll need to do a little more work.
a. Create a branch
We’ll need a new branch for GitHub Pages (below, we’ll assume it’s called gh-pages). Keep in mind, though - this is not where the workflow files should be located. This is where the the files of our report will be pushed. That's why you may create an empty branch that isn't related to any other branches in the repository:
git switch --orphan gh-pages
git commit --allow-empty -m "create a branch for GitHub Pages"
git push -u origin gh-pages
git switch a-previous-branch
b. Modify the workflow
Next, we need to update the workflow file - add the steps for loading report history, building the report, and publishing it to GitHub Pages. The file should look like this:
name: Run tests and publish the report
on: [push]

permissions: write-all

jobs:
  test:
    runs-on: ubuntu-latest
    steps:
      - uses: actions/checkout@v4

      - name: Set up JDK
        uses: actions/setup-java@v4
        with:
          distribution: zulu
          java-version: 17

      - name: Run tests
        run: SELENIDE_URL="${{ vars.SELENIDE_URL }}" ./gradlew clean test

      - name: Load test report history
        uses: actions/checkout@v4
        if: always()
        continue-on-error: true
        with:
          ref: gh-pages
          path: gh-pages

      - name: Build test report
        uses: simple-elf/[email protected]
        if: always()
        with:
          gh_pages: gh-pages
          allure_history: allure-history
          allure_results: build/allure-results

      - name: Publish test report
        uses: peaceiris/actions-gh-pages@v4
        if: always()
        with:
          github_token: ${{ secrets.GITHUB_TOKEN }}
          publish_branch: gh-pages
          publish_dir: allure-history
A couple of things to note here:
permissions: write-all: this line allows the workflow to push commits into the GitHub Pages branch.if: always(): these lines ensure the report will be built and published even if there are failed tests.
c. Enable the deployment
If you’ve run the workflow above, the report has been pushed to the gh-pages branch, but it’s not yet published. This will be taken care of by a second workflow that GitHub has to generate automatically. For that:
- Go to Settings > Pages
- Under Build and deployment, set the Source option to Deploy from a branch
- The Branch should be set to
gh-pages(or whichever branch you’re using for Pages)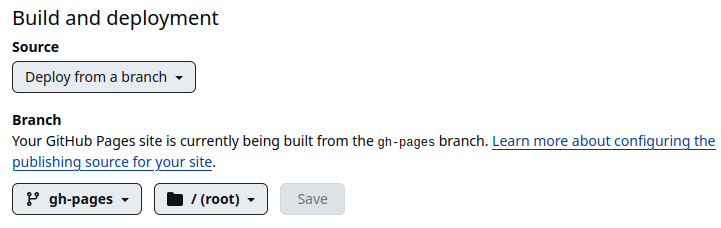
- Click Save
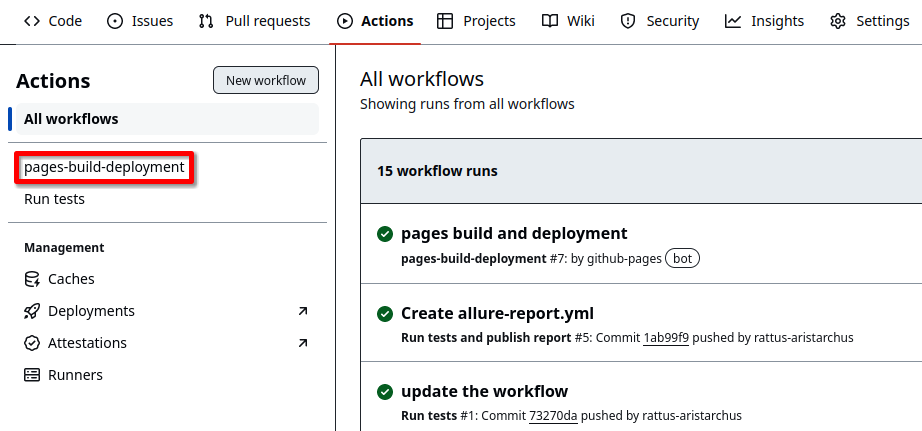
- Make sure the new workflow (pages-build-deployment) has been created under Actions:
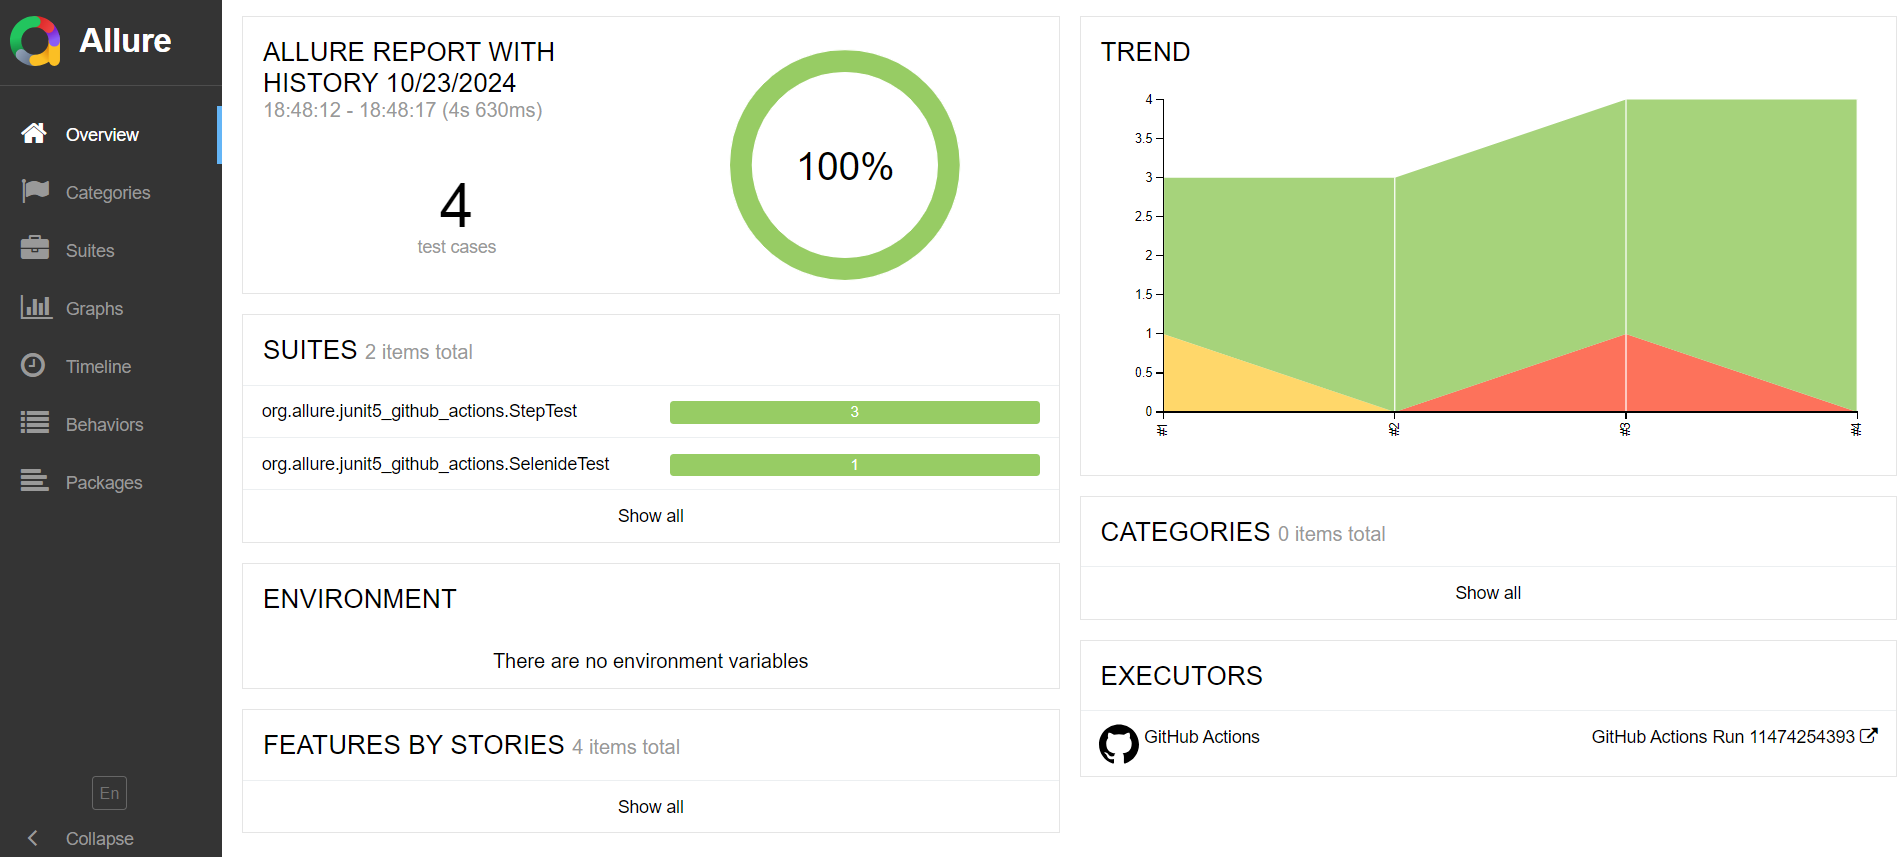
With that, your reports should appear at the domain that GitHub Pages has created for you (you can find the link under Settings > Pages):

The reports generated by this workflow will have history enabled. On the main page of the report, the Trend chart is interactive, and clicking it will take you to previous test runs:
And with that, you’re ready to test in a standardized and stable setting.
4. Conclusion
When working as a team, the best way to run tests is on a CI server; this allows everyone quick access to tests and ensures that test results are reproducible. GitHub Actions allows you to execute tests in a centralized setting, and Allure Report makes test results quickly accessible to the entire team.