Integrating screenshots and other attachments in Allure Report with Selenium and JUnit 5
Reading test results needs to be quick. Ideally, the person looking at the results should be able to figure out what went wrong without checking extra code, using a debugger, or asking teammates for help.
To make this happen, we should give a lot of information in a small space, and taking screenshots is a great way to do that. Let's try capturing screenshots with JUnit5 and Selenium and then viewing them using Allure Report.
1. Preparation
Prerequisites
Make sure the following prerequisites are met:
Dependency List
This guide uses the following packages:
- org.aspectj:aspectjweaver: 1.9.22
- org.junit:junit-bom: 5.12.0
- org.junit.jupiter:junit-jupiter-api: 5.12.0
- org.junit.jupiter:junit-jupiter-engine: 5.12.0
- org.seleniumhq.selenium:selenium-java: 4.29.0
- io.qameta.allure:allure-bom: 2.29.1
- io.qameta.allure:allure-junit5: 2.29.1
Code sample
The source code used in this guide is available at https://github.com/allure-examples/guide-junit5-selenium-screenshots.
Setup
To run the examples in this guide:
Install Java
Install Gradle
Install Allure Report
Download the sample repository
Navigate to the repository and run the command:
shell./gradlew test
2. Taking screenshots with Selenium
To take screenshots with Selenium at an arbitrary time, you can use the getScreenshotAs method provided by the TakesScreenshot interface. All Selenium WebDrivers and WebElements implement this interface. For example:
import java.io.File;
import java.io.IOException;
import java.nio.file.Files;
import java.nio.file.Path;
import java.nio.file.StandardCopyOption;
import org.openqa.selenium.OutputType;
import org.openqa.selenium.TakesScreenshot;
import org.openqa.selenium.WebDriver;

public class ScreenshotUtils {
    public static void savePageScreenshot(WebDriver driver, Path path) {
        File screenshotFile = ((TakesScreenshot) webDriver).getScreenshotAs(OutputType.FILE);
        try {
            Files.copy(screenshotFile.toPath(), path, StandardCopyOption.REPLACE_EXISTING);
        } catch (IOException e) {
            System.out.println("Can't copy the screenshot file:" + e.getMessage());
        }
    }
}import java.io.File;
import java.io.IOException;
import java.nio.file.Files;
import java.nio.file.Path;
import java.nio.file.StandardCopyOption;
import org.openqa.selenium.OutputType;
import org.openqa.selenium.WebElement;
public class ScreenshotUtils {
public static void saveElementScreenshot(WebElement webElement, Path path) {
File screenshotFile = webElement.getScreenshotAs(OutputType.FILE);
try {
Files.copy(screenshotFile.toPath(), path, StandardCopyOption.REPLACE_EXISTING);
} catch (IOException e) {
System.out.println("Can't copy the screenshot file:" + e.getMessage());
}
}
}Whenever you call any of the example functions, a screenshot will be saved at path.
3. Automatic screenshots on failure
To take screenshots automatically of every test failure, you can create a class implementing the JUnit5 TestExecutionExceptionHandler interface and override the handleTestExecutionException method. When a test fails, an exception is raised, and the handleTestExecutionException method allows handling this exception. Inside the overridden method, you should get a WebDriver or WebElement object and use the function from the previous section. For example:
import java.nio.file.Path;
import java.util.Objects;
import java.util.function.Function;

import org.junit.jupiter.api.extension.ExtensionContext;
import org.junit.jupiter.api.extension.TestExecutionExceptionHandler;
import org.openqa.selenium.WebDriver;

public class AutoScreenshotExtension implements TestExecutionExceptionHandler {

    // Function to extract WebDriver from the ExtensionContext
    private final Function<ExtensionContext, WebDriver> driverSupplier;

    public AutoScreenshotExtension(Function<ExtensionContext, WebDriver> driverSupplier) {
        this.driverSupplier = driverSupplier;
    }

    @Override
    public void handleTestExecutionException(final ExtensionContext context, final Throwable throwable) throws Throwable {
        final WebDriver webDriver = this.driverSupplier.apply(context);
        if (Objects.nonNull(webDriver)) {
            final Path path = Path.of("Screenshot on failure (" + throwable.getClass().getSimpleName() + ").png");
            ScreenshotUtils.savePageScreenshot(webDriver, path);
        }

        throw throwable;
    }
}
After that, you need to add your class implementing the TestExecutionExceptionHandler interface as an extension to your test class. In the example, there is WebdriverExtension that creates web drivers for the tests. This extension also provides the current instance of the web driver to AutoScreenshotExtension when a test fails. This is done via the lambda function that we are passing to the constructor of AutoScreenshotExtension:
import org.junit.jupiter.api.extension.RegisterExtension;

public class ScreenshotTest {
    // Extension for WebDriver
    @RegisterExtension
    WebdriverExtension webDriverManager = new WebdriverExtension();

    @RegisterExtension
    AutoScreenshotExtension screenshotManager = new AutoScreenshotExtension(
            c -> this.webDriverManager.getWebDriver(c));

    // Test logic
}
This way, on each test failure, a screenshot will be saved at path.
4. Integrating with Allure Report
Taking screenshots helps understand why tests fail, but looking at them all separately can be time-consuming. When test information is scattered in different places, figuring out and fixing problems takes longer.
To make this easier, screenshots should be added directly to Allure Reports. This way, all important test details are in one place for quicker analysis and troubleshooting.
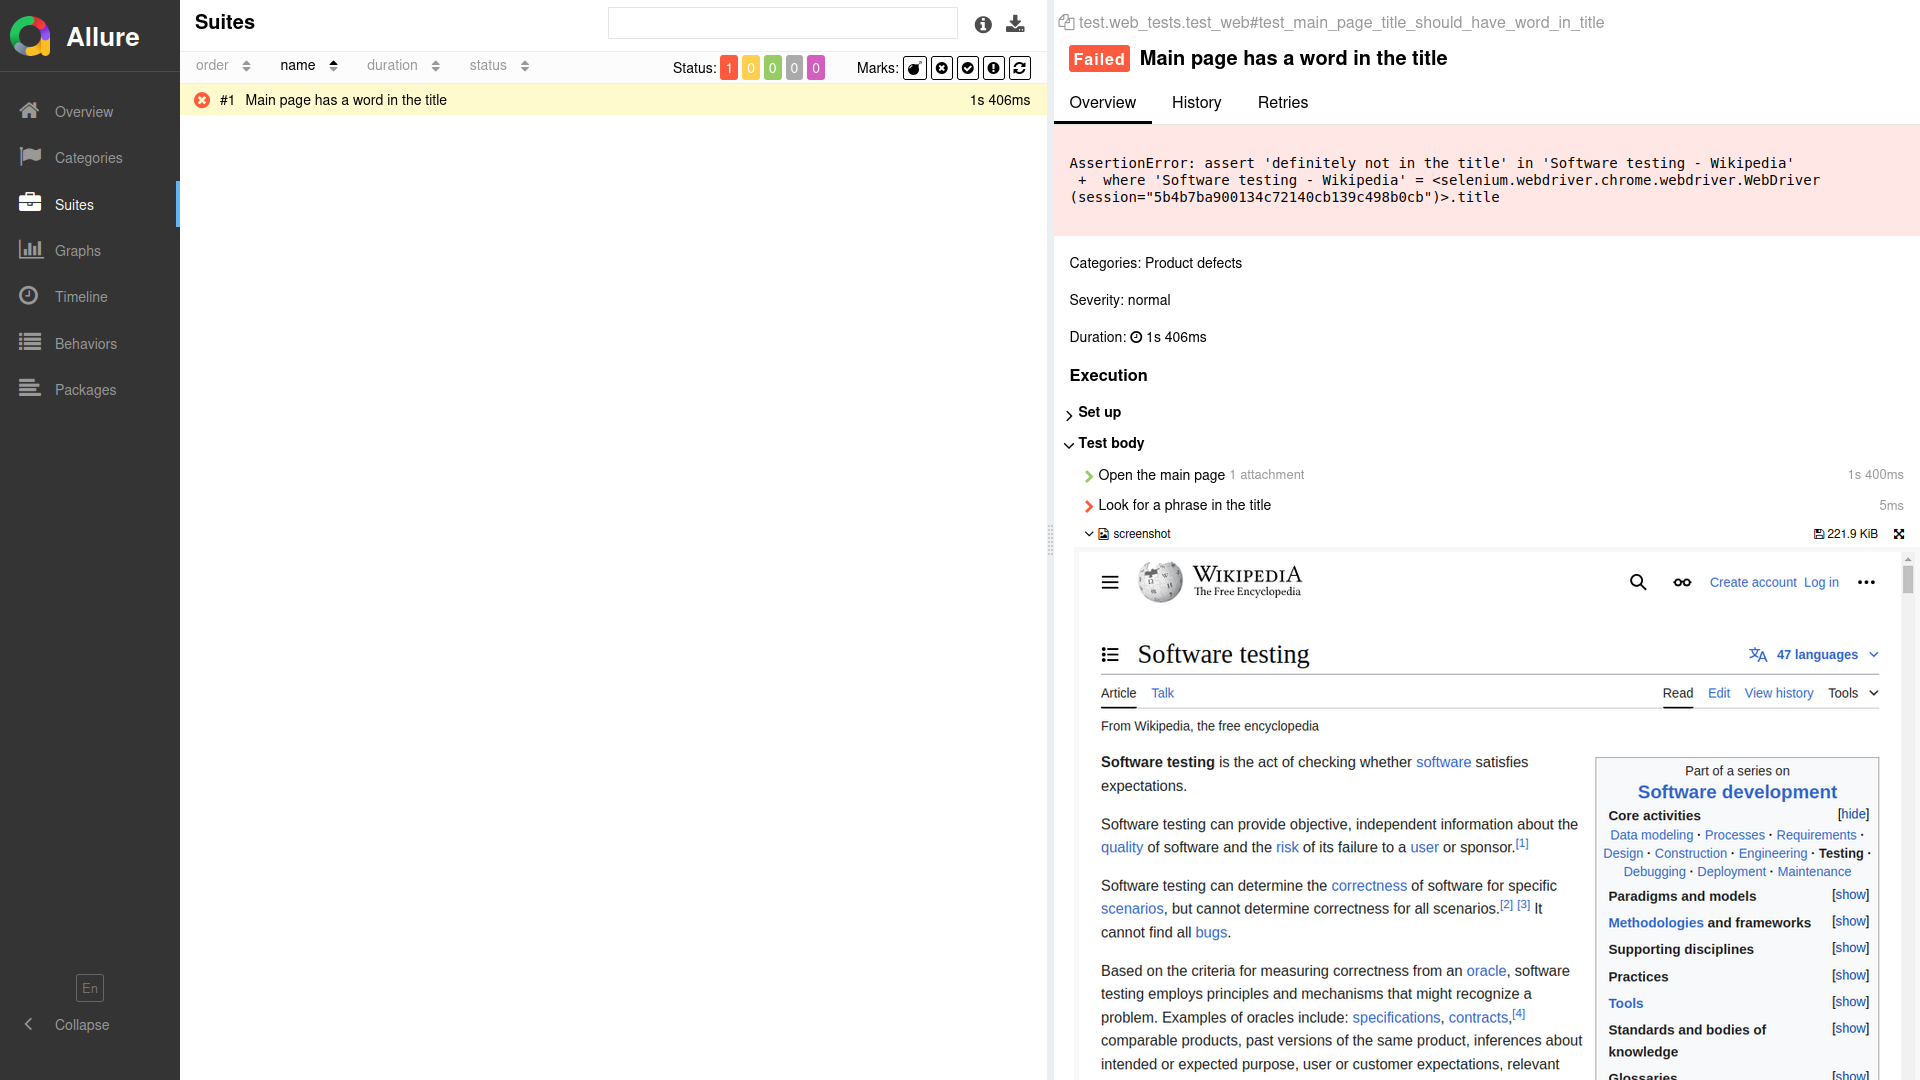
In Allure Reports, you can see the screenshots alongside the tests where they occurred. You’ll also find error messages and other important details there, making it easier to review test results in one spot:

To attach screenshots to Allure with Selenium, you can use one of the following:
- the
@Attachmentannotation - the
Allure.attachmentstatic method - the
Allure.addAttachmentstatic method
With the @Attachment annotation, you must define a method that returns an array of bytes byte[] or a String representing the attachment data. To ensure the browser displays the attachment correctly, we recommend specifying the media type in the annotation arguments. For example:
import io.qameta.allure.Attachment;
import org.openqa.selenium.OutputType;
import org.openqa.selenium.TakesScreenshot;
import org.openqa.selenium.WebDriver;

public class ScreenshotUtils {
    @Attachment(type = "image/png")
    public static byte[] attachPageScreenshot(WebDriver webDriver) {
        return ((TakesScreenshot) webDriver).getScreenshotAs(OutputType.BYTES);
    }
}import io.qameta.allure.Attachment;
import org.openqa.selenium.OutputType;
import org.openqa.selenium.WebElement;
public class ScreenshotUtils {
@Attachment(type = "image/png")
public static byte[] attachElementScreenshot(WebElement webElement) {
return webElement.getScreenshotAs(OutputType.BYTES);
}
}With the Allure.attachment static method, you can use slightly modified functions from the Taking screenshots with Selenium section:
import io.qameta.allure.Allure;
import java.io.ByteArrayInputStream;
import org.openqa.selenium.OutputType;
import org.openqa.selenium.TakesScreenshot;
import org.openqa.selenium.WebDriver;

public class ScreenshotUtils {
    public static void attachPageScreenshot(WebDriver webDriver, String name) {
        byte[] screenshotBytes = ((TakesScreenshot) webDriver).getScreenshotAs(OutputType.BYTES);
        Allure.attachment(name, new ByteArrayInputStream(screenshotBytes));
    }
}import io.qameta.allure.Allure;
import java.io.ByteArrayInputStream;
import org.openqa.selenium.OutputType;
import org.openqa.selenium.WebElement;
public class ScreenshotUtils {
public static void attachElementScreenshot(WebElement webElement, String name) {
byte[] screenshotBytes = webElement.getScreenshotAs(OutputType.BYTES);
Allure.attachment(name, new ByteArrayInputStream(screenshotBytes));
}
}To take automatically screenshot on test failure with Allure, you can use the TestExecutionExceptionHandler implementation as described in Automatic screenshots on failure and update the handleTestExecutionException method. For example, for using the Allure.attachment static method:
import java.util.Objects;
import java.util.function.Function;

import org.junit.jupiter.api.extension.ExtensionContext;
import org.junit.jupiter.api.extension.TestExecutionExceptionHandler;
import org.openqa.selenium.WebDriver;

public class AutoScreenshotExtension implements TestExecutionExceptionHandler {

    private final Function<ExtensionContext, WebDriver> driverSupplier;

    public AutoScreenshotExtension(Function<ExtensionContext, WebDriver> driverSupplier) {
        this.driverSupplier = driverSupplier;
    }

    @Override
    public void handleTestExecutionException(final ExtensionContext context, final Throwable throwable) throws Throwable {
        final WebDriver webDriver = this.driverSupplier.apply(context);
        if (Objects.nonNull(webDriver)) {
            final String attachmentName = "Screenshot on failure (" + throwable.getClass().getSimpleName() + ")";
            ScreenshotUtils.attachPageScreenshot(webDriver, attachmentName);
        }

        throw throwable;
    }
}
5. Other attachment types
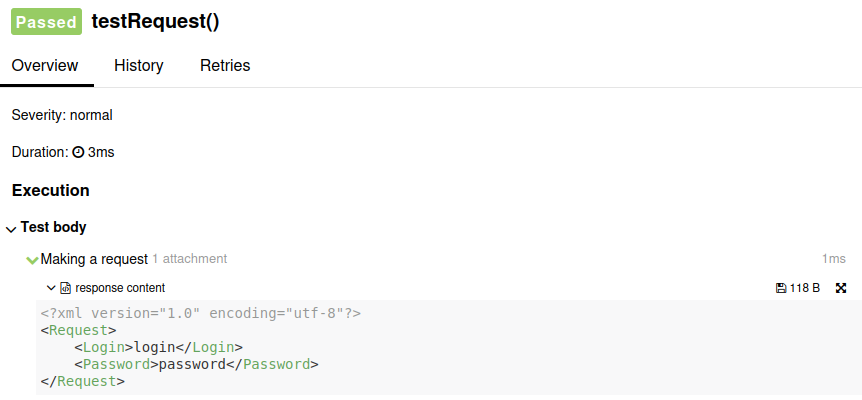
Allure Report can also handle other types of attachments, like text, tables, URI lists, documents (XML, JSON, YAML):
Allure.addAttachment("response content", "text/xml", responseContent);An example of a report with sush an attachment:

You can consult the official documentation for more on attachments with JUnit 5 and attachment types.
6. Conclusion
With Selenium and JUnit5, you can capture screenshots whenever you want during your tests, or you can set up a function that automatically takes screenshots at specific moments, like when a test fails or when it passes. Allure Report helps you see these screenshots along with other types of files (like text, documents, tables, and videos) for each test case. This gives anyone looking at your tests plenty of information to understand and fix any issues that come up.