
Publishing Reports to GitHub Pages
With Allure Report and GitHub Actions, you can automatically generate test reports and publish them to GitHub Pages.
To set this up, do the following:
- add actions for building and publishing reports.
- enable write access for workflow runs,
- set up publishing to GitHub Pages.
1. Add actions for building and publishing reports
At the end of your repository's testing workflow, add the steps that will load test report history, build test report and publish test report.
The two Allure Report engines need different steps for building the report. simple-elf/allure-report-action, the community action used for Allure 2 below, always generates an Allure 2 report internally (it bundles its own copy of the Allure 2 command line tool), so it can't be reused for Allure 3. For Allure 3, install the allure CLI directly in the workflow instead.
Here is a full example of a workflow file for a Java project. The example assumes that the branch used for GitHub Pages is called gh-pages.
name: Run tests and publish report
on: [push]

permissions:
  contents: write

jobs:
  test:
    runs-on: ubuntu-latest
    steps:
      - uses: actions/checkout@v7

      - name: Set up JDK
        uses: actions/setup-java@v6
        with:
          distribution: zulu
          java-version: 17

      - name: Run tests
        run: ./gradlew clean test

      - name: Load test report history
        uses: actions/checkout@v7
        if: always()
        continue-on-error: true
        with:
          ref: gh-pages
          path: gh-pages

      - name: Build test report
        uses: simple-elf/[email protected]
        if: always()
        with:
          gh_pages: gh-pages
          allure_history: allure-history
          allure_results: build/allure-results

      - name: Publish test report
        uses: peaceiris/actions-gh-pages@v4
        if: always()
        with:
          github_token: ${{ secrets.GITHUB_TOKEN }}
          publish_branch: gh-pages
publish_dir: allure-historyname: Run tests and publish report
on: [push]
permissions:
contents: write
jobs:
test:
runs-on: ubuntu-latest
steps:
- uses: actions/checkout@v7
- name: Set up JDK
uses: actions/setup-java@v6
with:
distribution: zulu
java-version: 17
- name: Run tests
run: ./gradlew clean test
- name: Build test report
if: always()
run: |
npm install -g allure
allure generate build/allure-results -o allure-report
- name: Publish test report
uses: peaceiris/actions-gh-pages@v4
if: always()
with:
github_token: ${{ secrets.GITHUB_TOKEN }}
publish_branch: gh-pages
publish_dir: allure-reportWARNING
This Allure 3 example doesn't carry test history between runs - each report is generated fresh, with nothing to compare it against. For test history that works properly with Allure 3, use the self-hosted storage service - see the Docker or Cloudflare Workers guides to set it up.
Load test report history
As discussed in Tests history, Allure Report can include some data from previous reports into each new report. This step applies to Allure 2 only - the Allure 3 example above doesn't carry history between runs; see the warning above. To load history for Allure 2, you need to provide it with the files published on GitHub Pages by previous runs. This step does it by doing a git checkout from the branch used for the GitHub Pages content.
In the workflow file, set the following values for this step:
name: any human-redable name, e.g., “Load test report history”.uses:actions/checkout.if:always().continue-on-error:true.with:ref: the branch used for the GitHub Pages content.path: an arbitrary name for a directory to which the previous data will be saved.
Build test report
This step produces the HTML report. For Allure 2, it's based on data from both the current and previous test launches; for Allure 3, see the warning above about history. How it works depends on the engine:
Allure 2 runs the Allure Report utility via simple-elf/[email protected]. The new report, along with the copies of previous reports, will be saved into the directory specified in allure_history, ready to be published to GitHub Pages. Set the following values for this step:
name: any human-readable name, e.g., “Build test report”.uses:simple-elf/[email protected].if:always().with:gh_pages: the directory name to which the previous data was downloaded. Must be the same as thepathvalue from the Load test reports history step.allure_results: path to the current test results directory. Depending on the framework you use and the Allure integration configuration, an appropriate path may beallure-results,build/allure-results, or some custom path.allure_history: an arbitrary name for a directory to which the result will be saved.
Allure 3 doesn't have an equivalent action, so the workflow installs and runs the allure CLI directly:
npm install -g allureinstalls the CLI.allure generate build/allure-results -o allure-reportbuilds the report into theallure-reportdirectory.
As noted above, this doesn't give you test history - for that, set up the self-hosted storage service instead.
Publish test report
The final step of the workflow will push the generated directory to the branch used for GitHub Pages. This is supposed to trigger a second workflow run, called “pages build and deployment”, which, in turn, will update the actual contents on the GitHub Pages domain. (See Set up publishing to GitHub Pages below.) This step is the same for both engines, aside from which directory gets published.
In the workflow file, set the following values for this step:
name: any human-redable name, e.g., “Publish test report”.uses:peaceiris/actions-gh-pages@v4.if:always().with:github_token:${{ secrets.GITHUB_TOKEN }}. See Enable write access for GitHub Actions for more details.publish_branch: the branch used for the GitHub Pages content.publish_dir: the directory to be published - theallure_historyvalue from the Build test report step for Allure 2, or theallure generateoutput directory (allure-reportabove) for Allure 3.
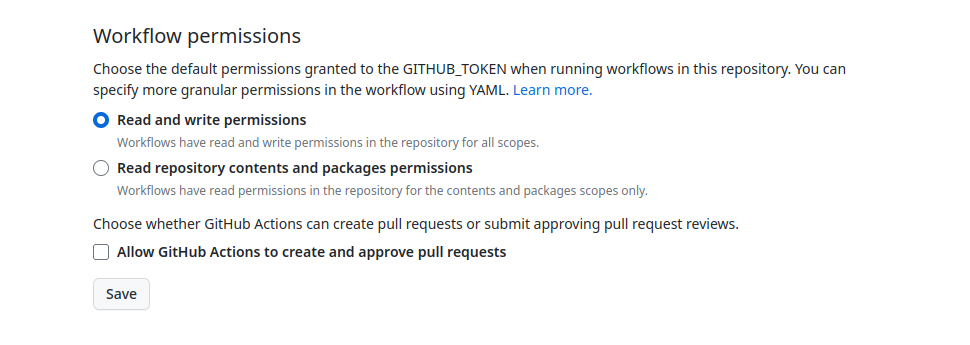
2. Enable write access for workflow runs
When pushing files to the GitHub Pages branch, the workflow uses an authentication token generated by GitHub. However, the default configuration does not allow GitHub Actions to push files to the repository.
The permissions: contents: write block already included in the example workflow above grants this for that one workflow only, which is the preferred, minimal-scope approach - prefer it over the repository-wide setting below when you can. (You may see older examples use the broader permissions: write-all instead - that grants write access to far more than this workflow needs, like issues and packages.)
If you'd rather grant it repository-wide instead - or if you're still seeing errors like this in your workflow run's logs even with the permissions block in place:
remote: Permission to ⟨USER⟩/⟨REPOSITORY⟩.git denied to github-actions[bot].
fatal: unable to access 'https://github.com/⟨USER⟩/⟨REPOSITORY⟩.git/':
The requested URL returned error: 403
To fix this, you need to grant write permissions to the token.
On the project's page on GitHub, go to Settings → Actions → General.
Under the Workflow permissions section, select the Read and write permissions option.
Click Save.
3. Set up publishing to GitHub Pages
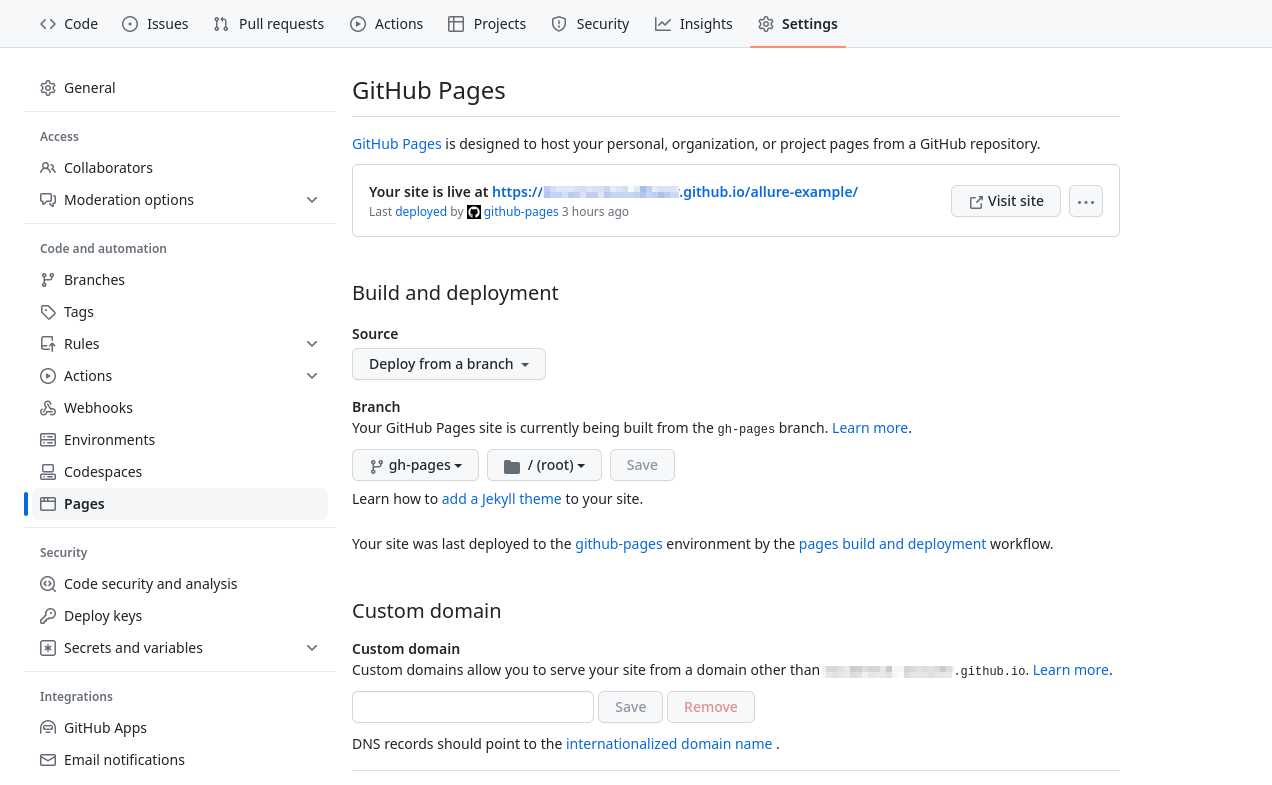
After you've run the workflow for the first time, it will push the test report to the gh-pages branch. On a public repository, GitHub will often detect this and publish it automatically, without any further action needed. If that doesn't happen - or you'd rather configure it explicitly - here's how:
Make sure that the branch with the content exists (
gh-pagesin the example above).On the project's page on GitHub, go to Settings → Pages.
Under the Build and deployment section, specify the options:
- Source: “Deploy from a branch”.
- Branch: the branch used for the GitHub Pages content. In the next dropdown list, select “/ (root)”.
Click Save.
Go to the Actions tab.
Make sure that the workflow run called “pages build and deployment” was automatically created.
Once the run is completed, the test report should appear on the GitHub Pages domain.
Once your CI is generating and publishing reports on every run, you might also want automatic pull request summaries - a results table, optional per-test breakdowns, and a Quality Gate check, all posted as PR comments. Take a look at the Allure GitHub Action for that; it's a separate, complementary action you can add alongside the workflow above.